• Skip to primary navigation
  • Skip to main content
  • Skip to primary sidebar
  • Skip to footer
  • Faith
  • Motherhood
    • Pregnancy
    • Meal Planning
      • Recipes
    • Large Families
  • Homeschooling
    • Homeschooling & Homemaking Printables {Free!}
    • Homeschool Room
    • Curriculum Reviews
    • Curriculum
    • Arts & Crafts
      • DIY
  • Special Needs
    • Dyslexia
    • Autism
  • About Us
    • Contact Us
  • Sponsors/Media Kit

Such a Time As This

Faith, Hope, & Love

10/18/2016

Ready to Teach Lessons for your Homeschool {Educeri Review}

Looking for a ready to teach supplement for your homeschool?

Educeri Review


Have your children been struggling with a certain subject?  I know that sometimes we hit a snag in our homeschooling and one of our children needs just a little extra practice on a certain subject.  I recently found Educeri and realized they have 1000s of lessons and practice in a significant amount of subjects for school-aged children of all ages.  Educeri …….  Educeri a division of DataWORKS has lessons for grade K-12 for a wide variety of subjects available with their Educeri Lesson Subscription Service.


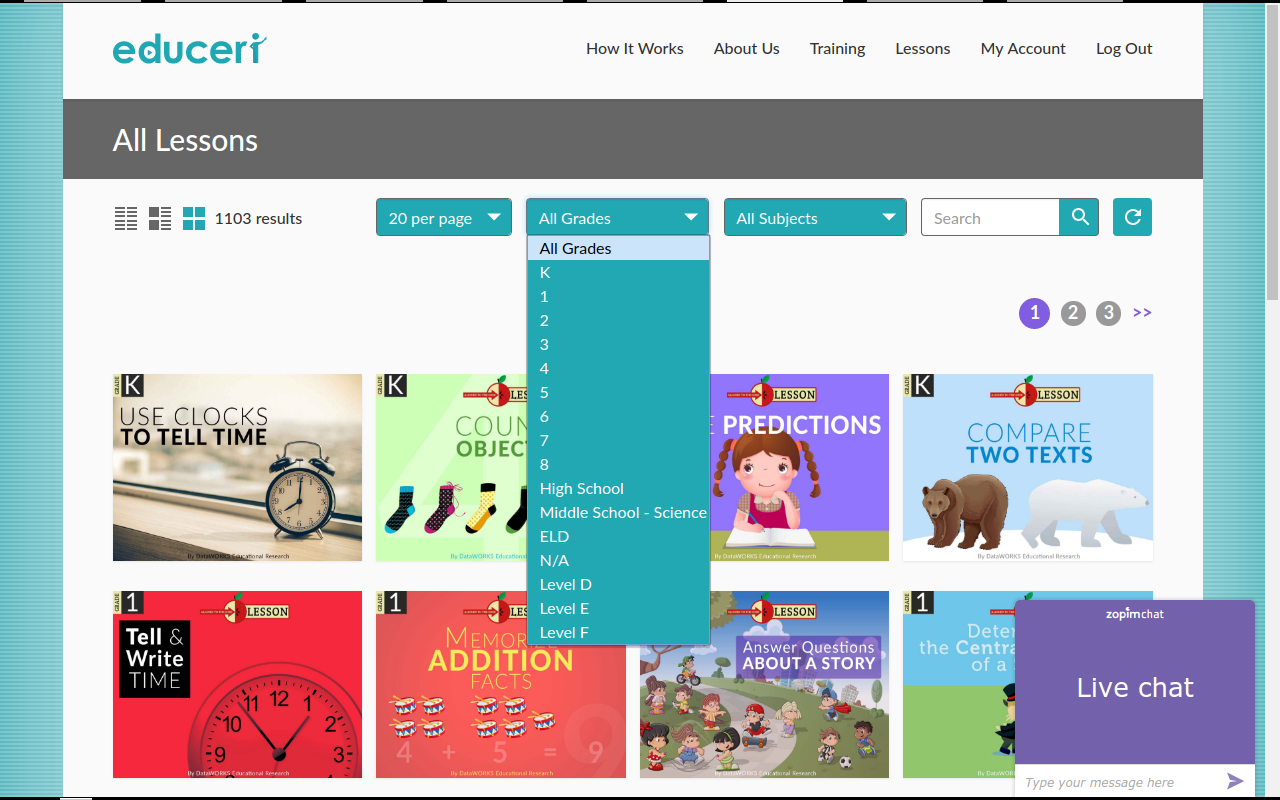
As I first scrolled through the website, I realized just how many lessons are offered.  I like that you can search by either grade level or by subject matter.  If you can’t find what you need, there is also a way to use the search bar to type in what you are looking for.  I love how easy it is to scroll through all of the content and lessons!educeri screenshot-2016-10-18-at-10-02-01-am


We decided to use this mostly for our 6th grader.  He has been struggling with dyslexia which means sometimes he doesn’t do enough language arts on his grade level because we spend so much extra time on spelling, phonics and reading practice.  We ended up first using the 6th-grade lessons on determining an author’s point of view.  

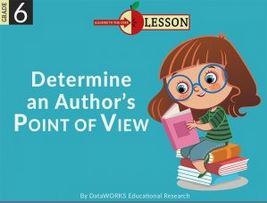
I like that the lessons are presented in a slide show format.  It does seem that this is geared toward kids in a classroom but it was easy enough for us to use one-on-one.  I clicked through the lesson and presented the material to my son.  I love that it is truly ready to teach.  There was absolutely no prep work needed from me.  I like that it gives the objective at the top of the page and presents questions that can be read directly to the student.  I felt confident in presenting the material to my son.  The way it is written out helped me determine what I needed to help him understand.

educeri


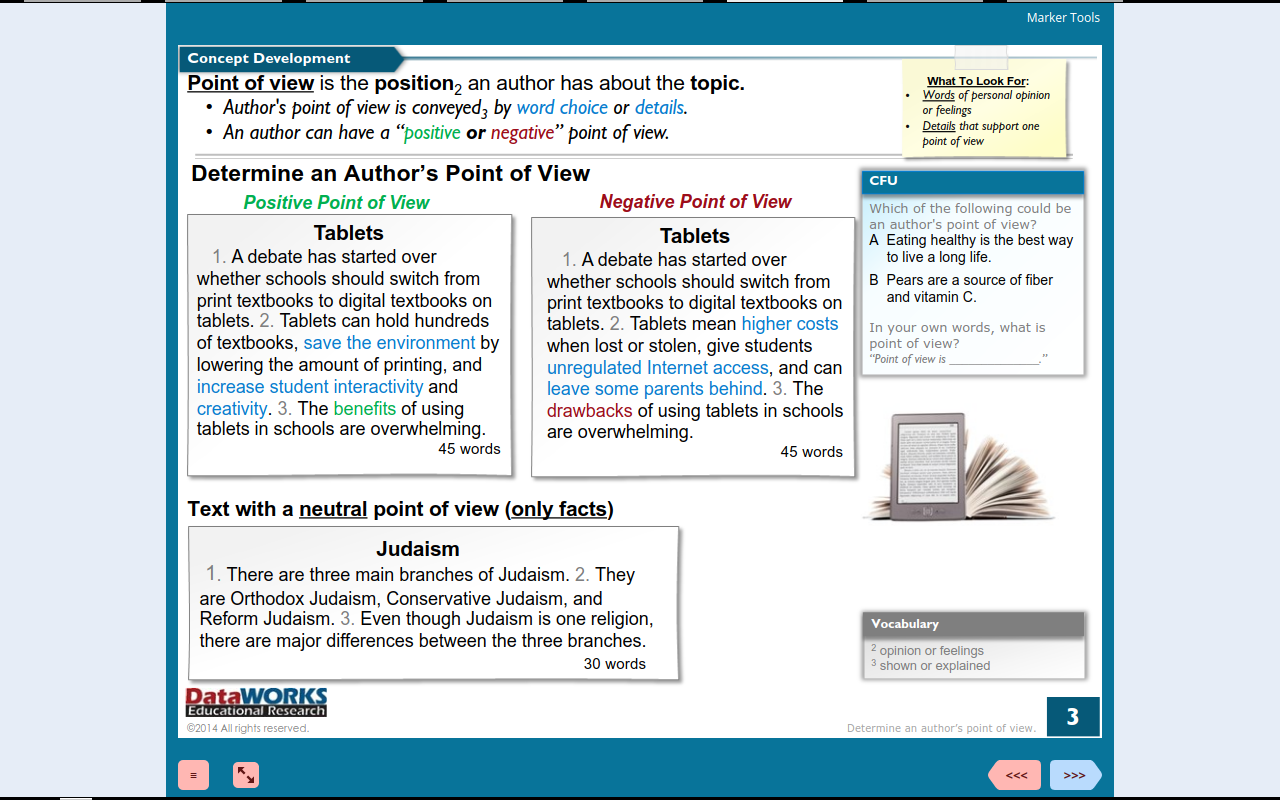
They also include plenty of practice.  They make it easy for the teacher because it gives us the answers.  The program gives us the real answers in red type and even underlines the correct parts so that we can make sure our students have a good understanding of the concept.


Educeri 
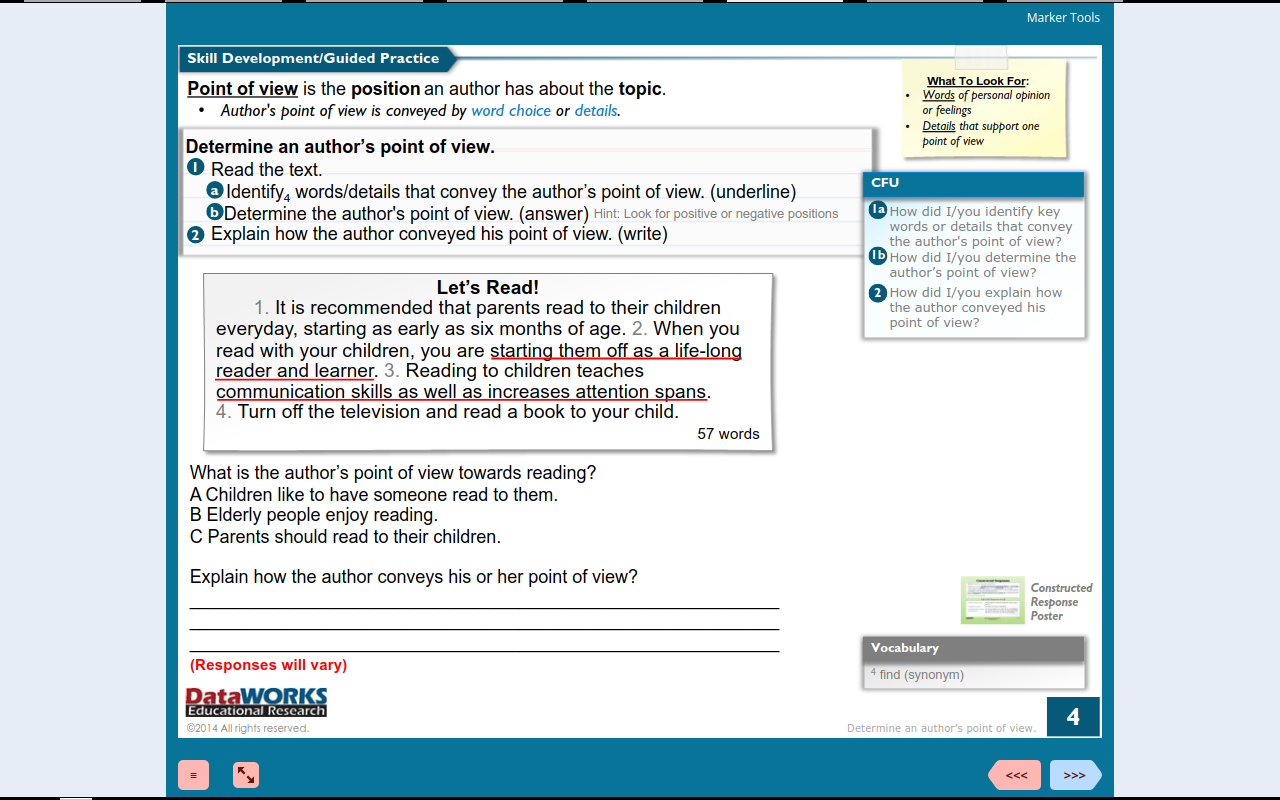
I love that Educeri provides student worksheets that they can work through as homework or with you as you present.  This provides a good amount of reinforcement on the subject matter.
screenshot-2016-10-18-at-9-55-59-am

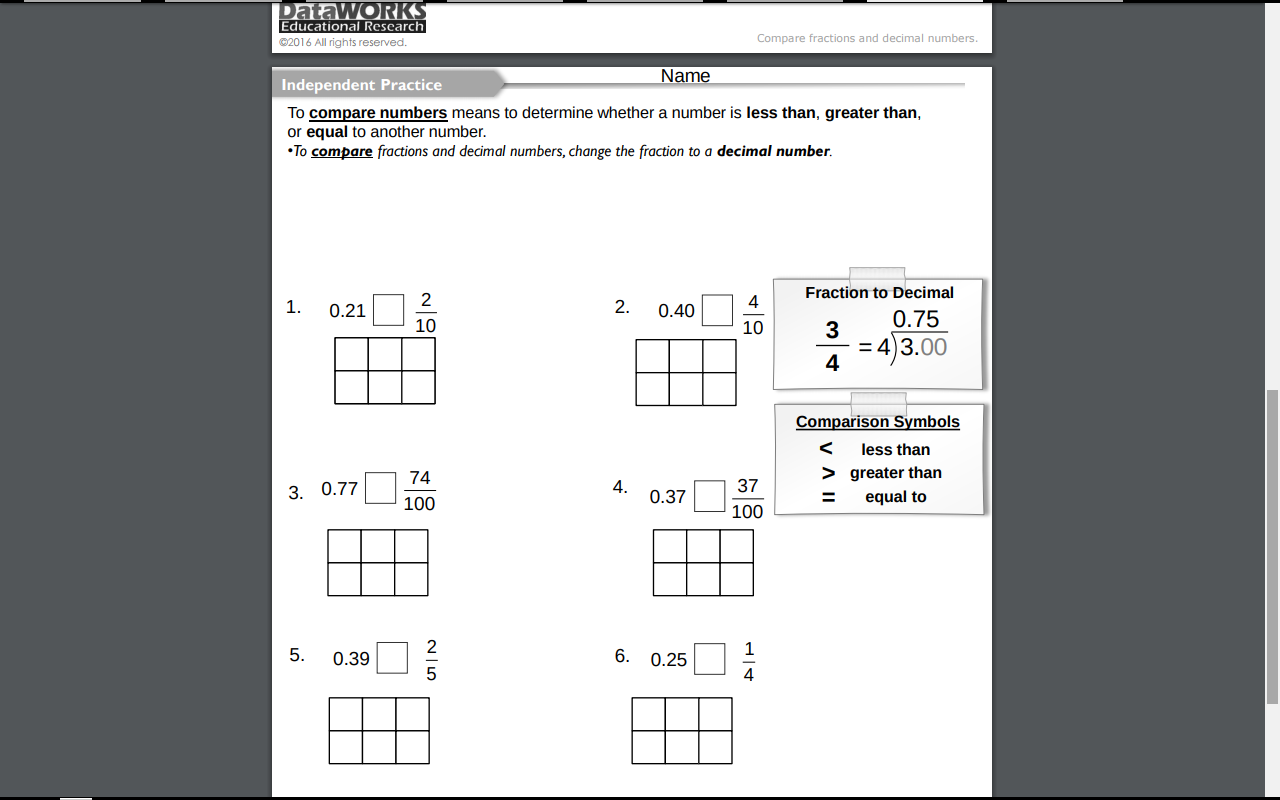
We also scrolled through the math and found some that our 6th grader needed extra practice on.  My son picked a lesson on the comparison of fractions and decimals and we found this to be a good one for practice.  Any math practice that is ready to teach is a HUGE plus!  He was able to work through the student worksheets after seeing the lesson presented through the slide show.

ready to teach

This curriculum is aligned with common core, which we aren’t too fond of.  We tend to stay away from any curriculum that uses common core.  However, this curriculum did have several subjects that we were interested in using and teaching, so it was a good fit for our family.

I personally like that this is a good supplement for our curriculum.  I also like that because it is completely planned out that it is ready to teach.  If there is something that my kids aren’t understanding fully, we can work through one of these lessons.  I will probably use this with my Kindergartener and Fourth grader, as well.  There are so many choices when it comes to math and language arts but I was pleasantly surprised at the amount of history and science lessons available as well.  My fourth grader, after seeing her brother use Educeri, is interested in it as well.  I definitely recommend this to other homeschoolers who might need a little extra practice!


To connect with Educeri on Social Media please see the links below:

Facebook: https://www.facebook.com/educeri/
Twitter: https://twitter.com/teacheduceri   @educeri
Pinterest: https://www.pinterest.com/Educeri/


To read more reviews by the Homeschool Review Crew, please click the banner below:

Educeri Lesson Subscription Service
getting started with french

Filed Under: Curriculum Reviews Sasha

10/14/2016

20 Easy Sewing Projects for Beginners

20 Easy Sewing Projects for Beginners

20 Easy Sewing Projects for Beginners


Don’t you love to create? I have found that when I’m creating my stress level falls and I feel so calm. My kids and I try to have a creative time every Friday afternoon. We sometimes to do art and other times we choose a craft. My 9 year old daughter has been learning to sew with her own sewing machine (We just bought her a good quality sewing machine for her birthday) I thought it would be fun to post some easy sewing projects from across the web. Check these out yourself and let me know which one is your favorite!


Easy Sewing Projects:

  1. Mermaid Tail Sewing Tutorial from crazylittleprojects.com
  2. Long Sleeved Peplum Tee Sewing Tutorial from merricksart.com
  3. Stuffed Felt Letters (sewing Tutorial) from buggyandbuddy.com
  4. Sewing With Kids from smallfriendly.com
  5. Flutter Sleeve T-shirt Sewing Pattern from scatteredthoughtsofacraftymom.com
  6. Sewing + Gifting: Favorite Zipper Pouches from madeeveryday.com
  7. Mermaid Doll from sugarbeecrafts.com
  8. Easy Women’s Vest Sewing DIY from mesewcrazy.com
  9. Jogging Shorts Sewing Pattern from mesewcrazy.com
  10. Encourage Sewing Practice With A Lucky Clover Necklace from hellobee.com
  11. Easter Bunny Sewing Pattern from mesewcrazy.com
  12. Easy Kid Sewing Project: Valentine Sachet from smallfriendly.com
  13. Travel Manicure Kit Sewing Pattern And Tutorial from positivelysplendid.com
  14. Easy Sew Outdoor Pillow from iheartnaptime.net
  15. Color Blocked Triangle Pillows from akailochiclife.com
  16. How To Make A Felt Clown Circus Character from sewkidding.com
  17. DIY Easy-sew Baby Harem Bloomers from lovelyindeed.com
  18. How To Sew Mini Crib Sheets from lovelyindeed.com
  19. Sew a softie day – how to sew a felt monster from sewkidding.com
  20. An Embroidered Bike Pom Pom Clutch from akailochiclife.com

Filed Under: Arts & Crafts, Homeschooling Sasha

10/10/2016

Freezer Cooking Meal Plans {MyFreezEasy Review}

Freezer Cooking Meal Plans

{MyFreezEasy Review}

Contains Affiliate Links.

So, you all know by now that I’m pregnant…very pregnant. I’m 30 weeks now and so it’s all downhill from here. I want to eat healthy stuff. I want to have homemade dinners every night. My energy has been drained from me and I don’t feel like cooking most nights. Let me start by saying I am so very thankful for this review and this opportunity to try out MyFreezEasy. The MyFreezEasy.com Freezer Meal Plan Membership from MyFreezEasy makes freezer cooking so fast and easy there is no excuse to not have a meal at home even with our busy schedule.

I’ll be honest and say: 1. I don’t LOVE cooking 2. We have 6 kids (and 1 on the way) 3. I’m 30 weeks pregnant 4. Did I mention that I’m not much of a cook? 5. I was skeptical to try this because the less time I spend in the kitchen, the better. My friend was telling me about her lovely new kitchen she build around best kitchen faucets 2017. She also has a big family so it was great to be able to get the whole kitchen up to date to deal with the large amount of food that is being cooked in there.

I was so very pleasantly surprised at my findings. I tried one month of meal plans out with a friend and I found out some key things about using MyFreezEasy.

1. I didn’t feel like I was cooking

2. I took less time to complete than I ever thought possible

3. I did my meal planning/cooking in the morning when I was less exhausted

4. These recipes turned me into a good cook (how is that possible)?

5. I only spent 2 hours making 15 meals (because some meals I doubled)

MyFreezEasy offers a meal plan for just about every food preference. They offer so many freezer cooking meal plans! Here is what they have this month:

Traditional Meal Plan

Gluten-Free Meal Plan

Slow-Cooker Meal Plan

Clean Eats Meal Plan

20 Meals Plan

ALL Chicken Meal Plans

ALL Ground Beef Meal Plans

ALL Pork Chops Meal Plans

freezer cooking meal plans

That’s a lot of freezer cooking meal plans and a lot of variety, you guys. I mean there really is something for everyone. My family has some food allergies and some picky eaters. It is not easy cooking for us. I really dread it. I decided it would be easier to swap meals on this month’s meal plan. So, I was able to pick and choose meals that had the right ingredients for us and make our own meal plan up of 5 meals. This was incredibly easy to do!

I also love that she offers ways to make each meal both gluten-free and dairy-free in case of allergies. (This was printed under the recipe as a helpful reminder or tip on making these meals more allergen friendly).

myfreezeasy Freezer Cooking meal plan

Once you decide on your meal plan you can print out the sheets. These consist of a Table of Contents (where it lists the five recipes you are making, the extra sheets you will be printing), a complete shopping list by recipe, a complete shopping list by store section or category, the freezer meal prep day shopping list by recipe and a freezer meal prep day shopping list by store section, there is also an assembly prep instructions and a meal assembly instructions. Ok – don’t get overwhelmed. You don’t necessarily have to use all these sheets. Let me break it down for you below:

The Recipe Sheets are completely necessary and probably the most import printout for this freezer meal cooking process. This is where you will find the recipe, how much it serves, the time it takes to prep and cook, cooking instructions for a single meal and also assembly prep for 2 meals. This sheet also includes freezing and thawing instructions, dairy-free and gluten-free modifications (if available – and it will tell you if there isn’t).

The Complete Shopping List by Recipe is a helpful sheet that shows you quickly how much of each food item you will need for each recipe. This can be helpful as a reminder on the cooking day – or if you decide at the last minute to cancel out a meal from your list you can see quickly what you don’t need.

freezer cooking meal plan

The Complete Shopping List by Store Section is great because it is a complete list. I mean this thing narrows everything down into which section of the store you will be shopping. I ended up doing most of my shopping online at a local grocery store – but this tells you category by category what you need (including the supplies like 6 gallon-size freezer bags.) This list includes everything you need including possible sides that she gives as suggestions. These are even added to your shopping list. So, I would consider this your master shopping list. If you use this, you will have everything you need in your home for all the meals (no running to the store last minute for anything).

Freezer Meal Prep Day Shopping List By Store Section is yet another shopping list but this time, it is only for your meal cooking day. This is everything you will need for that. So, if you are cooking and saving your meals for something (like the birth of a baby) maybe a month or two in advance, I would use this meal shopping list. That way, you won’t have a bunch of sides and extras that will go bad before you use the food.

Freezer Meal Prep Day Shopping List by Recipe – this is another shopping list but this time, again, it doesn’t include sides, it is only the ingredients used in your freezer cooking day. I think this list is best used to organize for your big day. You can make stations around your kitchen using this list because it breaks down exactly what you need for the freezer cooking day for each recipe.

Assembly by Recipe – This is if you prefer to load your freezer bags one recipe at a time. These are instructions printed out so that you know exactly what goes into each freezer bag. For instance for Cheesesteak Sloppy Joes: Half of the browned and cooled ground beef, half of the chopped bell peppers, half of the sloppy joe sauce, salt and pepper. This is kind of a little cheat sheet for quicker freezer cooking.

The Meal Assembly Instructions are helpful for walking you through what needs to be done before you fill your freezer bags. For instance “label your bags with printable labels or a sharpie, pull out all the ingredients into a central location or into stations.” It also tells you what you need to chop or pre-cook. It even tells you how long your assembly prep should take you (in this case 30-35 minutes).

myfreezeasy freezer cooking

I’m very very new to freezer cooking and creating freezer cooking meal plans. I tried it another time about 4 years ago (a few months before my 5th child was born). I remember it taking a lot of time and being a huge amount of cooking on one day. Something that I noticed about MyFreezEasy is that it is so simple. I guess I should have said it is easy. 🙂

Now, there is a slight learning curve mainly because of how many sheets there are available to print out. At first, I found the amount of sheets overwhelming – now I realize that they are included because you might want to use them – but you don’t have to use all of them every time. Only a few are absolutely necessary.

It took me about 2 hours (not including grocery shopping) to prep/cook/pack the meals in my freezer. I think that is pretty awesome for having made 15 meals. I did have help from a good friend. She helped me get organized, she labeled my bags and helped me pack some of them … however, I think it could potentially take us less time next time we do this because now we know what we are doing.

Myfreezeasy Freezer Cooking

Getting Started – My Suggestions

1.) I suggest creating stations (if space allows). So we used all of my counter space creating little stations for each recipe. My friend placed each recipe around my kitchen and then we got busy sorting out how many potatoes went to each recipe (most of mine were gluten free recipes and I am craving potatoes right now…so I bought a jumbo bag of red potatoes from Costco), the meat, veggies, and herbs for each one. This way when we got to packing it was super simple. We each just packed in what we needed in our labeled bags and then put it in the deep freezer.

myfreezeasy Freezer Cooking

2.) Use plastic page protectors if you have them. Another friend of mine suggested this and it was a great idea. I slid each recipe into a plastic page protector so that they didn’t get dirty or splashed by any of the ingredients. This way you can use them again.

myFreezEasy Freezer cooking3.) When you first start out I suggest you read through your recipes and get familiar with what you need to prep (I forgot to do this and I think that is what took me a little longer than it should). Also, do your shopping the day or night before your assembly and prep day.

4.) Labels – This time I just used a sharpie and wrote the recipe name, the thawing and cooking instructions. However, there are printable labels available on the MyFreezEasy website. These look great – you could print them on label making paper (sticky on one side) and all the directions would be included – there is even a place to write the date.

5.) Utensils – you need to make sure you invest in some really good kitchen utensils and equipment. One thing you definitely need to make sure you get your hands on is a brilliant kitchen knife. After much looking around I have found the best japanese knife that cuts through anything without any issues. This is exactly what you need in the kitchen, you don’t want to spend ages trying to cut one thing up!

6.) Videos – MyFreezEasy also offers short videos about the recipes and about assembly. This is very helpful if you are new to freezer cooking!

7.) Use a kitchen scale. It helps if you are weighing 12 pounds of potatoes into separate meals. Enough said.

The first night that I pulled out what I had made, from the freezer, was a happy one. It was Ranch Chicken and Baby Potato Bake. My husband loved it and asked me to make it again and it was a huge hit. All the kids loved it and best of all? It was EASY. It was also pretty healthy. I literally just grabbed the bag out of the freezer, dumped into the baking dish, put it in the preheated oven and baked for an hour. I shredded some cheese and poured it on top and baked for another 10 minutes. Voila. Dinner. Done.myfreezeasy freezer cooking

My favorite parts of The MyFreezEasy Premium Annual Membership:

  • Most meals use Gallon Freezer Bags instead of hard containers=more room in freezer
  • Awesome and Tasty Recipes
  • Easy Prep
  • GlutenDairy-Free Dairy Free Modifications for most meals
  • Meal Plans that Could Save Money on Grocery Budget (all ground beef or all chicken)
  • Easy to use for allergies or picky eaters (just grab the recipes your family can eat and create your own swapped out meal plan!)
  • Each recipe has an option to make a single meal the same day (without freezing)

I will definitely be using MyFreezEasy from here on out. Even if I don’t use these meals every night, I will use them most. I love knowing that there is always something in the freezer – minutes away from being a completely made meal. I love knowing that my kids are eating home-cooked meals most nights. I love knowing that cooking these meals won’t wear me out. If you prefer all slow-cooker meals there is a meal plan for that, as well. I like baking most of my meals in the oven. The prep is simple. The shopping lists are perfect. I couldn’t be happier with MyFreezEasy. It’s awesome for large family cooking.

To connect with MyFreezEasy on Social Media click below:

Facebook: http://www.facebook.com/freezeasy
Instagram: http://www.instagram.com/freezeasy
Pinterest: http://www.pinterest.com/5dollardinners/freezeasy


MyFreezEasy.com Freezer Meal Plan Membership {MyFreezEasy}
ancient eygpt

Filed Under: Homemaking, Meal Planning, Recipes, Uncategorized Sasha

10/07/2016

5 Tips for Cloth Diapering on a Budget

 5 Tips for Cloth Diapering on a Budget

Contains affiliate links.  Please see my disclosure policy.


You might have started to think about cloth diapering because you are on a tight budget and you are looking to save money.  Disposables are expensive.  You might be surprised to find out that cloth diapers can be very expensive, too!  I want to quickly share some ways to cloth diaper on a budget – these diapers really are way more affordable than disposables!  Here are my best tips to stretching your diapering budget and saving money with cloth diapers.

cloth diapering on a budget

1.) Use Prefolds:

Prefolds are a great choice if you are on a budget.  They are a basic flat style diaper except the middle panel is thicker (hence the name prefold) than a typical flat which you would have to fold several times to get the same absorbancy.  Please, please, please make sure you get some good quality prefolds.  There are some that sold in big box stores that should ONLY be used as burp cloths and not for actual diapers.  The prefolds I’m talking about are made out of 100% cotton and preferably organic cotton (or unbleached).  You will need to wash and dry these several times on hot to make them absorbent enough to use.

My Favorite Brand: Cloth-Eez Unbleached or Organic Prefolds

Don’t be afraid of these diapers.  They look confusing at first but they are really a breeze to use.  You can do a twist fold with these and use pins or snappis to hold shut …. or…. just simple tri-fold them (fold each side in toward the middle) and lay them in a wrap.  That is how I prefer to use prefolds.

How many?

If you use these full time, for a newborn you should plan on purchasing 2 or 3 dozen prefolds.  This depends on how often you choose to wash them.  Newborns go through more diapers than most older babies and toddlers.  Most new babies get changed 10-12 times a day.  Buying 2 dozen should last you for approximately 2 days with washing every 2nd day.  An older baby might only get changed 6 times a day, so you might be able to get by with 1 dozen or 2 dozen (if you wash every 4 days).  It definitely depends on the baby.

Cost?

These come in multiple sizes from preemie (which I’ve never tried because all my babies were over 7 pounds) all the way up to XL.  The newborn is what I start with (good for 6-10 pounds) and they can be used for many things after the baby outgrows them: burp cloths, wipes, cleaning rags, etc.  Starting at $25/dozen = $50 for basic starter (2 dozen diapers – these should last appr. 2 months) Small will last from 10 pounds – 15 pounds at $29/dozen and medium will last from 4 months to 20 months at $37/dozen, large lasts from 20-35 pounds (up to 3 years old) for $40/dozen).  You could potentially get by with just one dozen diapers after the 4-month mark.  (remember you need to add the wraps price $50 + $66 is $116.00).  The total cost of prefolds from birth until potty training is $185 plus the cost of wraps which should be around $135 which is $320.00.

cloth diapering on a budget

2.) Use Wraps:

Wraps are simply covers that have (usually) a form of velcro closure.  Sometimes they have snaps but for newborns, I prefer velcro covers.  I think it is easier to get a good fit and it is easier to simple close very, very fast.  My favorite wraps are:


Thirsties Sized Wrap

Thirsties Duo Wrap (lasts from 6-18 pounds for the Size 1)

Thirsties Duo Wrap Size 1 5 pack

Thirsties Snap Duo Wrap, Size Two (18-40 Lbs)


How many? 

This depends on how many you really want.  You could get by with 4-6 for the newborn stage.  The danger of the newborn stage is that most babies have runny poop and sometimes that can get on the cover.  You can always rinse the cover off and hang to dry (the inside is laminate) but if it is really too soiled to rinse, you will need to throw it in the diaper pail to be washed.
Cost?

These cost between $12.13.50 per wrap or $66 for a 5 pack.  I prefer the XS for newborn phase (they fit nicely under the belly button cord, they have nice gussets and I like the velcro for that age.  If you want to save more money, however, get the Duo Wrap Pack of 5 and it should last you all the way until 18 pounds!  For about $66 you’ve got covers that could potentially last you 6 months (because the XS are really tiny and will be done in about a month to 6 weeks).  So $132 from birth until potty training.  If you are cloth diapering on a budget, this is your cheapest option!

cloth diapering on a budget

3.) Workhorse Style Fitteds:

I like this if you are too timid to try the prefolds or if you feel like you want these for babysitters or other people who might be changing the baby.  Starting at just $6.50, these are a really good price for this convenience.

Workhorse Diapers (Cloth-Eez) White


Workhorse Fitteds (Cloth-Eez) Organic Cotton


How many? 

These would be the same as the prefolds … depending on age of the baby and if you are exclusively using this type of diaper (or are you using prefolds, too?) You could buy 1 or 2 (for the diaper bag) or you could buy 24.


Cost?

If you are using these and not prefolds go with 24 at $6.50/diaper (smallest size) = $156.00  Remember, you will still need wraps with these because they don’t have a waterproof outer-layer.  So add $66.00.  Full price of diapers + covers of the small size is $222.00

Price for fitteds ages birth – potty training is apprx. $600 (add another $138 if you need the largest size for 2-3 year olds) plus $132 for wraps… $732.00 ($870 adding in largest sized diapers).


4.) One-Size Diapers:

One-Size Diapers really do save money in the long run because they will last from birth (depending on how big your baby is) to potty training (depending on how big your child is when potty – trained … I would say on average most OS Dipes last from 8 pounds – 30 pounds).  These are a little bit higher investment in the beginning but they last and last.  All-in-ones and pockets are some of the EASIEST diapers out there to learn to use (or to pack in the diaper bag or leave for the sitter).

Here are some of my favorites:

BumGenius OS Pockets

FuzziBunz OS Pockets

Thirsties OS AIO


How many?
Are you going to use these full-time or only for the diaper bag/baby sitter?  If using these full time, you won’t need wraps or prefolds or fitteds.  Buy 24 of these at $16.95/BumGenius or buy a set Thirsties Package , Snap One Size All In One, Woodland Collection Mountain at $98/5 pack which equals about $400-470 for 2 dozen of these.  These diapers are easily sold, they will last until potty training, however, they are pricey.

cloth diapering on a budget

5.) Sell What You Don’t Need:

Most cloth diapers have a really good resale value.  So, even if you make an investment in a bunch of BumGenius from day one and want to sell them two years later, you should be able to.  I’ve ended up selling off so many diapers that my children outgrew or we no longer used.  From Craigslist to Facebook and even some message board (like diaperswappers.com) there are a lot of Buy/Sale/Swap sites for cloth diapers, believe it or not!  For cloth diapering on a budget, you can’t beat the resale value of cloth diapers!


As you can see from my math above … prefolds are by far the cheapest when used full-time.  One-Size are the next cheapest.  The difference is the amount of investment you must make all at once.  If you purchase a one-size and you have to buy 24 of them, you are making a huge ($400 plus) investment in the beginning wrather than spreading it across 2-3 years.  A lot of it depends on what you are hoping to get out of cloth diapering and what things you value.  Some people love the idea of cotton against baby’s skin and others would rather the ease of an All-In-One.


What diapers do you love for cloth diapering on a budget?


Filed Under: Deals, Family Life Sasha

10/06/2016

Teach our children to have Beautiful Handwriting {Review}

 Perfect Reading & Beautiful Handwriting {Review}


My son has struggled to have nice handwriting for a while.  We have tried cursive books and we’ve tried printing.  A few years ago, he was diagnosed with dyslexia and dysgraphia so I knew that there was a reason behind the struggle.  Eventually, his handwriting did improve but there were still little errors he was making that I longed to help him overcome.  I’ve also always loved calligraphy so I was excited for my son to try it using Perfect Reading, Beautiful Handwriting from Everyday Education, LLC.


This downloadable book is divided up into six chapters and a total of 60 lessons and then a section of practice pages.  This book is a combination of phonics lessons and handwriting and as it states in the introduction – it is driven by simplicity.  What is great is this: this book can be used for children just learning how to read, children who are struggling readers, and those who just need to improve their handwriting.


I love that there are multiple schedules available on page 7 of the book.  This will help you decide how to use it for your family and your student.  For instance, it offers advice if you are using this with a very young student  or with one who has learning challenges.  There are suggestions for each day of the week with some days only requiring 5 minutes of learning time and others 10.  There are also guidelines for school-aged students who are not yet reading and a separate section for those who are already reading.  This covers any need you could possibly have.  Most of these suggestions are for 5-10 minutes a day (but the schedules tell what exactly those time blocks will consist of) except for the students not yet reading – the suggested time is 15 minutes for most days for those students.


The introduction consists of a lot of great information you can utilize as you teach your students.  It goes over the four basic ways you can use this book such as teaching young children how to read and write, how to teach children with reading difficulties to read effectively, teaching a child to have fast, legible, attractive handwriting, and even to teach yourself to have beautiful handwriting!


My 6th-grade son does struggle with language arts because of his dyslexia and dysgraphia.  We decided to use this book primarily to strengthen his handwriting skills.  I felt it would be beneficial for him to re-learn how to make beautiful letters because that was an area where he really struggles.

handwritingtime-as-this

My son and I have been working through the basic letters of our alphabet.  I love that he is discovering for himself, using the written letters in the book and the arrow guides provided, which letters he has been writing backward or even not forming totally accurately.  Because he is at an older age, I was worried that this would become an even bigger issue but thankfully, possibly because of his age, he is able to use this book fairly independently and learn how to form the letters correctly.


I do like that this book contains some simple reading and spelling practice.  This sets it apart from most handwriting books, in my opinion.  For instance, in chapter 3 there are lists of words that contain the short a sound and the short e sound.  This is followed by a series of sentences which have been written out.  There is space below each written sentence for the student to rewrite the sentence.  Because we use the Charlotte Mason Method of homeschooling, we tend to do copywork every day.  This can easily be substituted for copywork until your child’s handwriting (and reading) is better.  This curriculum does provide many sentences to copy, it is just that these sentences make sense because they all contain words that are being taught with that lesson.

handwriting

Other lessons that are included in this handwriting curriculum are:


  • Blending with n


  • Compound Words


  • Blends including mp, tw, dw, pt


  • Short words that end in vowels


  • Long A combinations (ay and ai)


  • The sound of aw


  • Long O combinations (oa, o, oe)


  • The oo sound


  • Silent letters


  • Soft c, g, and dge


  • Important words (including days, months, seasons and people)


  • Number words (one, two, three, etc.)


  • Common Words


The handwriting practice section includes copywork from a famous poem,  “The Night Before Christmas,” and also covers information on how different types of italic writing look, slanted letters and joined letters.


This is a complete curriculum that could easily be used to teach reading, writing, spelling and handwriting!  I’m very impressed at how easy this is to teach and how simple it is to include in our daily lessons.  I also love that it so much easier for my son to do than cursive was.  For some reason, he really struggled with it but this italic style handwriting was a winner!  He seemed to really enjoy using it and his handwriting has already improved!  I definitely recommend trying out Perfect Reading & Beautiful Handwriting in your homeschool!

To connect on social media:

Pinterest: https://www.pinterest.com/janicecampbell/
FB: https://www.facebook.com/janicepcampbell
FB page: https://www.facebook.com/excellenceinlit/
LinkedIn: https://www.linkedin.com/in/janicepcampbell
Google : https://plus.google.com/u/0/ JaniceCampbell
Twitter: https://twitter.com/everydayedu

Beautiful Handwriting, Literature and Poetry {Everyday Education, LLC}
ancient eygpt

Filed Under: Curriculum Reviews Sasha

« Previous Page
Next Page »

Primary Sidebar

Welcome

Hi There! I'm so glad you're here! I'm Sasha, wife to my best friend and mama to 7 kids. My passion is homemaking, homeschooling, and encouraging parents of kids with special needs. We are all on a journey. Find what you were made for with some hope and encouragement on the way. xo Sasha

Free Printables

homeschooling homemaking printables

Pinterest

Looking for something?

Footer

Archives

Looking for something?

Recent Posts

  • Gluten-Free Candy Cane Cookies
  • The Best Gluten-Free Chewy Gingerbread Cookies
  • My Pandemic Birth
  • Hope When There Is No Hope
  • When You Walk Through The Fire: An update on our Year (2019)

© 2015 Pretty Happy WordPress Theme · By: Pretty Darn Cute Design